
Craving something rich, creamy, and packed with cookies-and-cream goodness? This easy Oreo cheesecake recipe is the perfect homemade treat for dessert lovers of all levels. Whether you’re a seasoned baker or trying cheesecake for the first time, this step-by-step guide will walk you through the process with simple ingredients and no complicated techniques. From the crunchy Oreo crust to the velvety smooth filling, every bite delivers indulgent flavor and satisfying texture. Get ready to impress your family and friends with a dessert that looks fancy but is surprisingly easy to make at home.
How to Make Oreo Cheesecake Step-by-Step
For additional tips and baking techniques, check out this comprehensive baking guide
Make the Oreo Crust
The crust is the foundation of any great cheesecake, and this Oreo version brings a rich, chocolatey base that perfectly complements the creamy filling. To make the Oreo crust, you’ll only need two ingredients: Oreo cookies and melted butter — that’s it!
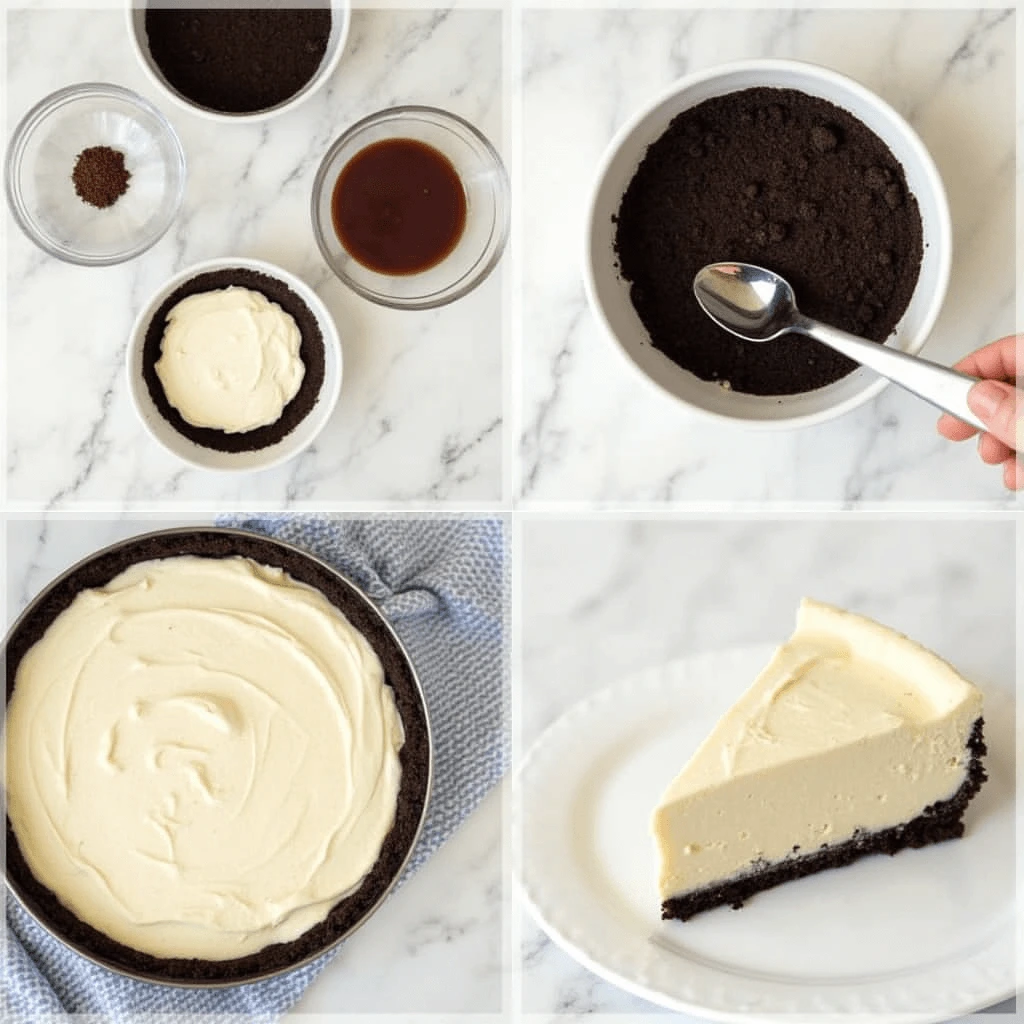
Start by crushing the Oreo cookies into fine crumbs. You can do this by pulsing them in a food processor or placing them in a zip-top bag and crushing them with a rolling pin. There’s no need to remove the cream filling from the cookies — it actually helps the crumbs bind together better.
Next, melt your butter and combine it with the Oreo crumbs. Stir until the mixture looks like wet sand and is evenly coated. The butter not only holds the crust together but also adds a rich flavor that enhances the cookie base.
Press the crumb mixture firmly into the bottom of your springform pan. Use the bottom of a measuring cup or glass to press the crust down evenly, making sure it’s compact and reaches slightly up the sides of the pan. A tightly packed crust ensures a sturdy base that won’t crumble when you slice your cheesecake.
If you’re baking your cheesecake, consider pre-baking the crust for 8–10 minutes at 350°F (175°C). This helps set the crust and gives it a slightly crispy texture. For a no-bake version, just chill the crust in the refrigerator for about 20 minutes while you prepare the filling.
Prepare the Cheesecake Filling
The heart of any cheesecake lies in its filling, and this Oreo cheesecake is no exception. Rich, creamy, and full of flavor, the filling is what gives this dessert its signature indulgent texture and irresistible taste. The good news? It’s surprisingly easy to make.
Start with room-temperature cream cheese — this is key to achieving a smooth, lump-free batter. Use full-fat cream cheese for the best texture and flavor. Beat it in a large mixing bowl until it’s soft and fluffy. This step is essential because it gives the filling its light and creamy consistency.
Next, add sugar gradually while continuing to beat the mixture. The sugar not only sweetens the cheesecake but also helps break down the cream cheese further for an ultra-smooth result. Then mix in vanilla extract to enhance the flavor and give the filling a subtle, aromatic sweetness.
Once your base is smooth, it’s time to add eggs, one at a time. Beat on low speed and mix each egg just until incorporated — overmixing at this stage can cause cracks during baking. If your recipe calls for it, you can also add heavy cream or sour cream for extra richness and a slightly tangy depth of flavor. This helps create a silky, melt-in-your-mouth texture.
Now for the best part: the Oreos! Gently fold crushed or chopped Oreo cookies into the batter using a spatula. This keeps the cookies from breaking down too much and ensures that every slice is packed with chunks of chocolatey goodness.
Once combined, pour the cheesecake filling into your prepared Oreo crust, smoothing the top with a spatula. You’re now ready to bake or chill your cheesecake, depending on whether you’re making a baked or no-bake version.
Assemble & Bake
Now that you’ve prepared both the Oreo crust and the creamy cheesecake filling, it’s time to bring it all together. This stage is where your Oreo cheesecake starts to take its final, delicious shape — and with a few simple steps, you’ll be well on your way to a stunning, sliceable dessert.
Step 1: Pour the Filling into the Crust
Carefully pour the cheesecake filling over your prepared Oreo crust, spreading it out evenly with a spatula or the back of a spoon. Make sure the filling reaches the edges of the pan and smooth out the top to create a flat surface. If you like, you can gently tap the pan on the counter a few times to release any trapped air bubbles — this helps prevent cracks during baking.
Step 2: Prepare a Water Bath (Optional but Recommended)
If you’re baking your cheesecake and want a perfectly smooth top with minimal cracking, consider using a water bath. Wrap the bottom of your springform pan in aluminum foil to prevent leaks, then place it in a larger baking dish filled with about an inch of hot water. The steam from the water bath helps regulate the temperature and keeps the cheesecake moist as it bakes.
Step 3: Bake the Cheesecake
Preheat your oven to 325°F (163°C). Bake the cheesecake for 50–60 minutes, or until the edges are set but the center is still slightly jiggly — it will continue to firm up as it cools. Avoid opening the oven door during baking, as sudden temperature changes can cause cracks.
Step 4: Cool Gradually
Once baking is complete, turn off the oven and crack the oven door, allowing the cheesecake to cool slowly for about an hour. Rapid temperature changes can lead to cracks, so this gradual cooling step is important. Afterward, remove the cheesecake from the oven and let it come to room temperature.
Step 5: Chill
Transfer the cheesecake to the refrigerator and chill for at least 4 hours or overnight. This step is essential to let the cheesecake fully set, firm up, and develop its creamy, dense texture.
Let it Set & Serve
After all your hard work assembling and baking your Oreo cheesecake, the final — and perhaps most important — step is letting it set properly. This part might require a little patience, but it’s crucial for achieving that perfect, sliceable consistency and allowing the flavors to fully develop.
Step 1: Cool at Room Temperature
Once the cheesecake has finished baking, allow it to cool in the oven with the door cracked open for about an hour. This slow cooling process helps prevent cracks on the surface. After that, remove the cheesecake from the oven and place it on a wire rack to finish cooling to room temperature. Don’t rush this step — moving the cheesecake to the fridge too early can lead to condensation on the surface, which affects both texture and appearance.
Step 2: Chill in the Refrigerator
Once it has cooled to room temperature, cover the cheesecake with plastic wrap or foil and place it in the refrigerator for at least 4 hours, though overnight is ideal. Chilling allows the cheesecake to firm up completely, making it easier to slice and serve. The extra time also helps meld all the flavors together, giving you a richer, more balanced taste.
Step 3: Add Toppings (Optional)
Before serving, you can dress up your cheesecake with extra toppings to make it look even more irresistible. Try whipped cream, chocolate ganache, cookie crumbles, or even whole Oreos arranged decoratively on top. This not only adds flavor and texture but makes the presentation extra special — perfect for parties or special occasions.
Step 4: Slice & Serve
Use a sharp, warm knife to cut clean slices. Wipe the knife with a damp cloth between each cut for neat, bakery-style servings. Serve chilled for the best texture and flavor. The result? A creamy, cookie-packed slice of heaven with a smooth finish and just the right balance of richness and crunch.
Letting your Oreo cheesecake set properly is the final key step that takes it from good to truly spectacular. Now all that’s left to do is enjoy every decadent bite!
Hi, this is a comment.
To get started with moderating, editing, and deleting comments, please visit the Comments screen in the dashboard.
Commenter avatars come from Gravatar.